Whether you are using SRAM or Shimano, it is crucial to your trail stoke to have a properly adjusted rear derailleur on your mountain bike. A rear derailleur that is out of adjustment can cause mis-shifts and riding annoyances that not only damage equipment, but can cause injury. With all of these cables, gears and shifters, how can we be sure that our rear derailleur is properly adjusted? Let’s walk through it…
Note: This guide covers every aspect of the rear derailleur from initial installation to adjustment. Use the headers as a guide to get the information you are in direct search for. Look for Shimano Rapid Rise info at the bottom of this post…it is adjusted differently due to the nature of rapid rise.
Tools Required
- Medium Philips Head Screw Driver
- 5mm Hex Head Wrench
- Cable Cutters (if using new cable)
- Chain Tool (if installing new chain)
Initial Rear Derailleur Installation
All mountain bike rear derailleurs are installed initially the same way.
Thread the 5mm rear derailleur bolt into your derailleur hanger on your frame. Tighten the 5mm bolt to 8 – 10 Nm (70 – 85 in.lbs). Be sure to have the alignment block in the correct position (as shown) so that the derailleur is situated properly on the frame.
Install Mountain Bike Chain
 Position your chain around the biggest ring of your crank and the largest cog on your cassette. Wrapping the chain around each and not threading through the rear derailleur, take this measurement and add two links. This is where you will be cutting your chain to length with a chain tool. After your chain is cut to the correct length, thread the chain through the rear derailleur and secure the link.
Initial Rear Derailleur Adjustment
After you have installed your rear derailleur on your mountain bike, there are some initial adjustments that need to be made that apply to all rear derailleurs…regardless of brand or type.
Limit Screw Adjustment
The limit screws on your rear derailleur control how far your derailleur can move towards and away from your cassette. It essentially “limits” the movement of the rear derailleur beyond a point you set and this prevents the chain from falling off the backside of the cassette into the spokes or off the front side into the frame. There are independent adjustment screws for the low level and high level adjustments. Both Shimano and SRAM require the same positioning of the limit screws, but the location of their screws are different.
 Low Adjustment Screw – Adjust the low limit adjustment screw so that the upper pulley is in line (center to center) with the largest cog on the cassette. Manually push the derailleur out with your hand and turn the crank arms until it stops to make this adjustment. You should feel the derailleur move back and forth as you change the positioning of the limit screw. When the limit screw is in the correct position, you should not hear any clicking from the chain as it rides from the cassette to the rear derailleur.
High Adjustment Screw – Adjust the high limit adjustment screw so that the upper pulley is in line (center to center) with the smallest cog on the cassette (outer most). By letting go of the rear derailleur completely and turning the crank arms, the rear derailleur will sit at the point of the high adjustment screw. Make your adjustments and watch the derailleur move. When it is adjusted correctly, the chain will not click or skip in this position.
Chain Gap Adjustment
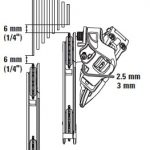
Using the bolt on the rear of the rear derailleur, you need to adjust the gap between the top pulley of the derailleur and the bottom of the cassette on both the high and low end. Ideally, you want this gap to be 1/4″ (6mm). Make this adjustment by pushing the rear derailleur to the largest cog by hand. Adjust against the largest cog and double check on the smallest.
The picture below is from SRAM’s instruction manual. In the Shimano instructions, they recommend you get the pulley as close to the cassette as you can. I tend to stay with the SRAM recommendation of 1/4″ in both cases. Be sure to check the distance from the cog on all points of the cassette as shown.
Shifting Cable Install and Shifting Adjustment
After you have the rear derailleur on your mountain bike installed and initial adjustments completed, it is time to install the shifting cable and fine tune your shifting.
Install Shift Cable
- Start by making sure that your shift cable housing is properly secured to the frame and attached correctly to the rear derailleur. The housing should not constrict the movement of the rear derailleur in any way.
- Shift the SRAM or Shimano rear derailleur shifter to the smallest cog (hardest gear) to release the most cable.
- Turn barrel adjuster all the way in (clockwise) and then back out one full turn.
- Pull the cable, releasing all slack and thread through the guides on the rear derailleur.
- Pull cable tight and tighten down the bolt that secures the cable.
- Shift the derailleur through the gears while spinning the cranks forward several times.
- Repeat steps 3 through 4 again to make sure that all slack is out of the shift cable.
- Cut shifter cable an inch or two beyond the bolt with cable cutters and install cable end to prevent fraying.
At this point, you mountain bike should be shifting pretty well with maybe a little delay or clicking between gears.
Fine Tuning Your Shifting – Index adjustment
Once you have everything installed correctly, it is time to fine tune the shifting on your rear derailleur. The barrel adjusters found on your shifting pods tighten and loosen your shifting cable and bring it to near perfect adjustment. Shimano SIS rear derailleurs also have a secondary barrel adjuster on the rear of the derailleur.
While spinning the cranks forward while the mountain bike is in the stand, click through your gears to see if you have any delays in shifting or jumping. Typically, you will have to tighten the cable tension 1 or 2 clicks to get things functioning properly. Turning the barrel adjusters counter clockwise will get you this affect. Only move the adjusters one click at a time during the fine tuning process.
So everything is adjusted…now what?
We are done right? No…not quite yet. Unfortunately, most bikes shift differently in the stand than they do under load. It is always a good idea to get out and ride your mountain bike on inclines and flats in your neighborhood testing your shifting under load. Make small adjustments with the barrel adjusters to account for suspension movement and chain tension.
Shimano Rapid Rise Rear Derailleurs
Shimano Rapid Rise rear derailleurs operate differently than your conventional rear derailleurs. Instead of naturally falling towards the smallest gear in the cassette, they pull inwards to the largest without any cable tension. When adjusting a Rapid Rise rear derailleur, you will have to manually push the rear derailleur to the smallest cog instead of the largest. Adjust the high limit first and double check against the smallest as before, but to start with zero cable tension…you need to be in the easiest gear on your rear derailleur shifter pod.
For the best deals on derailleurs and tools, check out JensonUSA.com.


